Baby Duck, Beginner's Crochet Pattern
- Emilia's Crochet

- Mar 24, 2020
- 4 min read
Updated: Jan 26, 2021


Hello everyone! I wanted to introduce to you this adorable Baby Duck pattern! This is a beginner-
friendly crochet pattern. This pattern can be used as a dishcloth, potholder, or even just used for decoration. I want to thank my pattern testers, @lochs_knots and @beeboss19 (on Instagram) for testing this pattern and helping me with some of the issues it had. I hope you enjoy the pattern!!

Baby Duck Pattern by Emilia from Emilia’s Crochet
This pattern is written in US terms.
Instagram: emilias.crochet
Youtube Podcast: Crochet Lover’s Crochet Podcast
Facebook Shop: Emilia’s Crochet Business Email: emiliascrochet@yahoo.com
*copying, selling, distributing, or claiming this pattern as your own is not permitted*
Materials
I recommend using cotton yarn for this project. Using cotton yarn will allow you to use this as a dishcloth or potholder. I used Lily Sugar ‘n Cream.
-color 1 (light yellow : Lily Sugar ‘n Cream Yellow)
-color 2 (black : Lily Sugar ‘n Cream Black)
-color 3 (Red or orange : Lion Brand Yarns, Re-Up Red)
-4.5 mm crochet hook (or any other yarn and hook combination to fit your gauge)
-yarn needle
-scissors
Abbreviations
Approx- approximately
Ch- chain
Dc- double crochet
Dcin- double crochet increase
Mc- magic circle/ring
Sc- single crochet
Sc2tog- single crochet two together
Sl- slip (commonly used as slst...slip stitch)
St- stitch
*- repeat whatever follows the * as indicated
#x- repeat that many times
()= stitch count Ch 3 counts as dc
Notes
A ch 3 counts as a dc.
A ch 1 counts as a sc.
MC Alternative
R1 Make a sl knot and ch 3. Make sure there’s a long tail, so you can crochet over it to eventually cinch. Slst to the 2nd st from the hook.
R2 Ch 3 and dc 15 inside the loop. Slst to the top of the ch 3. Pull the tail and cinch the circle together.

---------------------------------------------------------------------------------------------------
Gauge
This should be a 2x2 in square.
R1 Begin with a slst and ch 9. In the 3rd stitch from the hook, dc across. (6 dc)
R2 Ch 3 and flip. Dc across. (7 dc)
R3 Repeat r2.

---------------------------------------------------------------------------------------------------
Body
R1 Using color 1, starting with a mc, ch 3 and add 15 dc. Don’t forget to crochet over your tail. If you would rather replace a mc with a ch circle, refer to the instructions at the top of the page. Sl st to the top of the ch 3. (16 dc)
R2 Ch 3, dcin throughout the row. Slst to the top of ch 3. (32 dc)
R3 Ch 3, *dcin, dc* repeat this till the end of the row. Slst to the top of ch 3. (48 dc)
R4 Ch 3, *dcin, dc, dc* repeat this till the end of the row. Slst to the top of ch 3. (64 dc)
This is the end of the body. Cut the yarn, make sure you leave a long tail. This should have a diameter of 5 inches.

---------------------------------------------------------------------------------------------------
Head
R1 Using color 1, starting with a mc, ch 3 and add 15 dc. Don’t forget to crochet over your tail. If you would rather replace a mc with a ch circle, refer to the instructions at the top of the page. Slst to the top of the ch 3. (16 dc)
R2 Ch 3, dcin throughout the row. Slst to the top of ch 3. (32 dc)
R3 Ch 3, *dcin, dc* repeat this till the end of the row. Slst to the top of ch 3. (48 dc)
This is the end of the head. Do not cut the yarn. This should have a diameter of 4 inches.

---------------------------------------------------------------------------------------------------
Attaching the Head to the Body
We are going to attach the head to the body. Lay both pieces on the wrong side to slst. Slst the two pieces together five times. Now is a good time to sew in your remaining ends. Turn it on the right side to attach wing, beak, and eye. From now on we’re going to be working on the side that doesn’t have the slst bump.

---------------------------------------------------------------------------------------------------
Eye
If you would prefer to use a safety eye instead, go ahead. If you use this as a potholder, the eye might melt--keep that in mind.
Using color 2, start with a mc and ch 1. Sc 5 times in the ring. Make sure you’re crocheting over the tail. Pull the tail and cinch the eye together. Slst in the ch 1. Cut the yarn, make sure to leave a long tail to sew with.

---------------------------------------------------------------------------------------------------
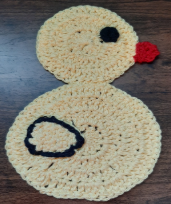
Attaching the Eye
Place the eye in this general direction, as pictured.

Sew the eye onto the head. Make sure that it is thoroughly attached.

---------------------------------------------------------------------------------------------------
Wing
R1 Using color 1, make a sl knot and ch 9. Sc in the 2nd st from your hook and the rest of the ch. (8 sc)
R2 Ch 1 and turn. sc2tog, sc 4, sc2tog. (6 sc)
R3 Ch 1 and turn. sc2tog sc 2, sc2tog (4 sc)
R4 Ch 1 and turn. sc2tog twice. (2 sc) Cut your yarn and sew in your tails.
R5 Attach color 2 and slst around the wing. Slst to the first slst. Cut your yarn and make sure to have a long tail.

---------------------------------------------------------------------------------------------------
Attaching the Wing
Place the wing in this general direction, as pictured. Place the wing with the rounded side facing diagonally.

Sew the wing onto the body. Make sure that it is thoroughly attached.

---------------------------------------------------------------------------------------------------
Beak
R1 Using color 3, make a sl knot and ch 5. Starting with the 2nd ch from the hook, sc in the next 4 chains. (4 sc) R2 Ch 1 and turn. sc2tog twice. (2 sc)
R3 Ch 1 and flip. sc2tog. Cut your yarn and leave a long tail for attaching. (1 sc)

---------------------------------------------------------------------------------------------------
Attaching the Beak
Place the beak in this general direction.

Sew the beak onto the head. Make sure that it is thoroughly attached.

---------------------------------------------------------------------------------------------------
Congratulations! This is the end of the pattern! Make sure to leave a review on Raverly, if you have any comments or concerns regarding the pattern, please email me.
*copying, selling, distributing, or claiming this pattern as your own is not permitted unless you contact me first*

Comments